Just to bring this up to date (and a close)
The golf project unfortunately came to a close a couple of years ago, when I moved house and could no longer afford the indulgence. The car was given to a friend who was rebuilding it, and managed to squeeze the 1.8 MK2 gti engine in, but then he moved and could no longer had space for it.
The sad truth is that it got broken up, mostly recycled as donor parts :(
Currently I'm driving a '91 Scirocco GTII, whilst my Mk2 valver is in the garage patiently waiting for some TLC.
dubmodder.com
I stumbled across a great website today whilst reading some posts on the golfgti.co.uk forum.
Dubmodder lets you play about with different add ons and get an idea of what you're car might look like by the time you've finished.
They don't have 5 door mk1s to play with unfortunately, but here is what I came up with, and if it looks at all like that I'll be pretty happy :)

Things to do…
This is a list of the things I can think of. I'm a sure to have forgotten a lot, so it will grow!
Refurbish:
- Brake Linkage
- Pedal Box
- Steering Rack
- Gear Linkage
- Rear Beam
- Rear Brakes
- Fuel Tank
- Steering Column
- Headlight surrounds
- Front Hubs
- Drive Shafts
- Front Wiper Linkage
- Rear Wiper Linkage (lay flat?)
Bodywork
- Cleanup and make good underside
- Passenger side floor and sill repair
- Driver side floor and sill repair
- Passenger side rear arch repair
- Driver side rear arch cleanup & repair
- Fuel filler patch
- Clutch cable bulkhead patch
- Rear panel repair/replace
- Front valance cleanup/replace/repair
- Repair Scuttle Panel
- Engine Bay surface rust cleanup
- Passenger side rear door repair
- Surface rust below windscreen
- Fit new wings
- Door handles?
To Buy
- Front wings
- Digifant loom to fit mk1/mk2 fuse box
- Mk1 loom to fir mk1/m2 fuse box
- Anti Roll Bars (front and rear)
- Strut Braces (Front top, Front bottom and Rear)
- Poly bushes
- Track control arms
- Rear brakes
- Front brakes (carriers for mk2 gti or 256mm ones)
- Brake pipes
- Fuel pump
- Fuel filler pipe
- Fuel filler panel
- Fuel filler cap
- Clutch cable bulkhead patch panel
- Rear Panel
- Narrow Bumpers?
- Head Lights
- Suspension
- Interior
- Carpet
- Sound proofing
- Rear Brakes
- Back Plates (part no.s NSR 6N0609425A, OSR 6N0609426A)
- Drums
- Wheel Cylinders (mk 3)
- Adjusters
- Shoe Fitting Kit
- Shoes
- 16v Brake Servo
- 16v Master Cylinder
The strip down continues
Well the front calipers turned out to be a complete pain. I made a mess of getting the first retaining bolt off, which started to round, so I then went and bought a blow torch before I tried the others. With a bit of heat and a long lever, the others came off ok. But the first one did not want to budge at all.
So yesterday my friend and I took the hub off (together with the drive shaft and the brake caliper) and attacked the offending bolt with my pillar drill. It still didnt quite come off (mostly because the larger sized drill bits we had were blunt), a sharp whack with a chisel and lump hammer was enough to convince it to move.
At this point I remembered that I had forgotten to loosen the nut that holds the drive shaft into the hub whilst the engine was still in the car. Doah! So after trying to attach the driveshaft to the gearbox out of the car (which just span the dif) we put the gearbox back into the engine bay and attached the shafts to it. The nuts came off no problems at all then.

We then finished removing the dashboard (which was already mostly undone), and the heater matrix and blower. The wiring loom came then came out, with everything nicely labelled up. My friend then removed the steering rack and attempted to construct a temporary way to keep the wheels pointing in the same direction. In the end we decided it would be simpler just to put the steering rack back in and remove it when needs be.

The steering column and pedal box came out the car next leaving the interior pretty much empty. There are still some bits of trim to remove (in particular the head lining :( ). The engine bay is now empty apart from the brake lines.
All in all it was a nice and productive day with a lot less of the problem issues that plagued me the week before. Nice to keep moving at a decent rate. Soon the car will be completely stripped and I'll be able to start making the body good.
I'm going to build a four point stand to lift the car up off the floor as the axle stands cant get it high enough. When I'm removing the undercoat from the bottom of the car I am going to want as much space as possible.
Brake Conversion
This is really just a note to myself to keep info to do with the brakes.
Front Callipers for a 256mm conversion:Audi 80 quattro (83 to 85)
Audi 90 5-cylinder (85 to 87)
Audi Coupe 5-cylinder (85 to 88
Scirocco 16V (if you can find one !!)
How to tell if they're the right ones:"Does it have a brake pad wear sensor ? (yes is bad, if no then.......)
Is the disk 256mm diameter ? (if yes then......)
Are the mounting bolts for the caliper (where slider bolts to stub axle) 7.5cm apart from centre of bolt head to centre of bolt head ? (if not they will be more like 9.5cm which is no good, if they are 7.5cm apart then.....)
Take one bolt out from where the caliper slider mounts to the stub axle. Does the threaded part of the bolt fit nicely in a 10mm spanner ? (if no it will be 12mm - no good for a Mk1. If yes then congrats, you've found the right calipers !)
All the calipers I've had have had 'Girling' cast into the tops of them. Many of the 'wrong' Audi ones have VAG stamps, but many of the Girling ones are unsuitable also. Confusing, eh ?!?"
Taken from the Mk1 owners club forumsHowever these are proving difficult to get your hands on, so apparently (and I need to check this) Mk2 GTI 8v calipers will go straight onto the mk1. I've got a set, so I'll offer them up and see if they fit. Although it wont be 256mm, it should be ok with the 16v servo and master cylinder. then I can keep my eye out for the above 256mm calipers and change them later.
WRONG! - although the spacing for the retaining bolts is the same, the carriers for the caliper on the mk2 two brakes are built into the hub (on the ones I have anyway) and the mk2 hubs are too different to the mk1. So it looks like I am looking for the 256mm ones again. I need to make sure the small block mk1 front hubs are the same as the mk1 gti's
HOWEVER! - you can get carriers seperately so I need to keep my eye out for these, I think I can get them from a cabby or a mk1 gti, or ?caddy?
Other Stuff16v Servo
Plate from a 16v between the servo and the bulkhead
Reduce the length of the threaded bit on the end of the servo
Master Cylinder
felt seals for the linkage
Got all this from Carbs resto on the mk1 owners club forum.
Rear Brake Refurb...
The rear brakes are rusted to hell and back (see a post below) so I want to replace the rear drums completely:
Back Plates (part no.s NSR 6N0609425A, OSR 6N0609426A)
Drums
Wheel Cylinders (mk 3)
Adjusters
Shoe Fitting Kit
Shoes
Further Dismantling
I've had the last week off work and have spent the last 3 and half days working on the car. I'm not sure whether the amount I expected to acheive was unrealistic, but I certainly havent been able to do as much as I would have liked.
Braking System
This was simple enough. I removed the pipes from the master cylinder, caught the break fluid that dripped out and removed the master cylinder from the servo. With the linkage arm unbolted from the servo and from the bulkhead where the pedal is, and the servo unbolted from inside the passenger footwell, the servo came off with a bit of pulling. The whole set up has quite a bit of surface rust on it, but should clean up alright.
The Doors
I mentioned in my previous post that I didnt expect the car to come out the garage for a while... I hadn't taken into account getting the doors off. There wasnt enough room to open the doors fully so I had to push the car out the garage. Except I couldn't cause the brakes were totally seized. My Valver came to the rescue and towed the Mk1 out of the garage. Took an aweful amount of pulling. I half expected the brakes to suddenly release and the mk1 fire itself at me. Luckily that didnt happen. The brakes were still stuck on however and would need to be sorted before I could push the car back in the garage.
The Front Doors came of easily, held in place by a nut at top and bottom. The back doors were another matter. They are held in place by 4 hex key bolts (the type that take an allen key). With the correct sized bit from my socket set I tried everything, including an impact driver and really long lever. I didnt get to try heat because by then I had 8 circle key bolts, totally rounded off. That left me with no choice but to drill the things out, which to my satisfaction worked out ok, and I have been able to remove all but one of the studs from the car. The remaining one is loose, but was wound in by the drill bit when I was drilling it out. I just need to drill a pin hole and glue a something in there to let me undo it. No bother. I do need 8 rear door bolts however!
The Fuel Tank
Another reason for taking the car out the garage was to safely remove the fuel tank. That was a bit of a unpleasant job, mainly due to the dust and stuff constantly falling into my eyes (I've bought some goggles now). The fuel filler pipe and the exterior panel where it fits are corroded and are going to need replacing/repairing. When I came to lowering the rear cross member one of the bolts rounded off. However I couldnt grind it off as I had a fuel tank with all its pipes disconnected sitting next to it. I bought a nut splitter from machine mart (see pic). Blooming marvelous thing and not very expensive. Put it over the bolt and wound it in. I didnt split the bolt completely as I wanted to make sure I didnt damage the stud it was on, but it was enough to release it so that it could be taken off.
With the rear cross member released and hanging of the flexi brake pipes the fuel tank still wouldnt come out, so I had to cut the pipes (no problem as they are all going to be replaced any how) And then, finally, the fuel tank was out.
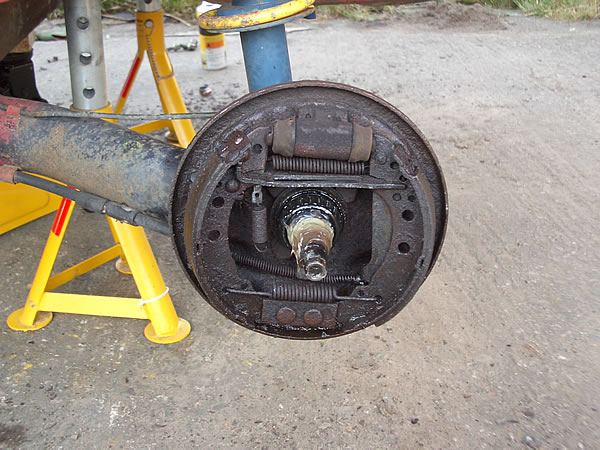
Rear BrakesBefore I could get the car back in the garage I needed to sort the brakes out. I decided to remove the brakes from inside the drum, that would stop them seizing! I then found that I couldn't actually get the drum off. Even though I had lifted the adjusting wedge on the inside of the drum to release the mechanism, no amount of hitting, prying (with a long screwdriver) and WD40 seemed to do it. The brake shoes didnt not want to let go of the drum. They weren't stuck to it as I was now able to spin the drum freely, but the thing would not come off.

This got really annoying. However after a good nights sleep and some
advise from the golf mk1 owners club forum, I approached the problem with renewed enthusiasm (and a bigger hammer, a longer pry and an awful lot of pentrating oil). After making sure everything was shocked free with the lump hammer I was able to use the longer pry bar to open up the side of the drum. This meant I could directly spray the pentrating oil between the shoe and the drum. Once I had done that it came of relatively easily. Then I approached the second one, and knowing what I now know, it came of really quickly, even though it was just as stuck.
The whole of the brakes, the drum, the backing plate and the mechism are totally rusty (click on the pic to get a better look) and will have to be replaced. I wasnt planning on a rear disc conversion, but maybe I will...

With the mechanism removed and everything put back together the car lightly rolled back into the garage. It had been outside for the best part of three days! and I had been working on it pretty much solidly. I've learnt alot, and if I had to do all this again I now know how, and its built my confidence up. I just wish it hadnt taken so long!
Now I need to turn my attention to the front brakes, the retaining bolts of the calipers seem totally solid...
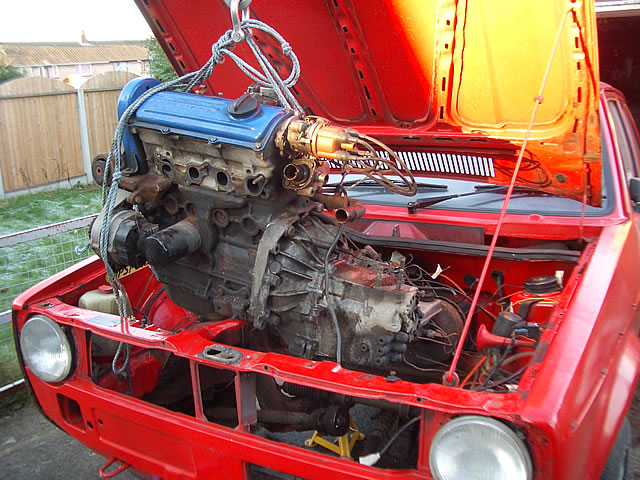
Removed the engine.
Spent another full day with the car on Sunday (my better half is being very understanding!). Started off taking a closer look at the new engine & gearbox. The gear box only seems to have 4 positions that can be selected at the moment. I'm not sure if that is normal, or if you should be able to select all six directly at the box without the engine running.
We then took the gearbox off the engine and put them both safely to bed at the back of the garage.

Then it was time to remove the old 1.1 engine from the car. All in all this went pretty smoothly. The the 12 bolts holding on the driveshafts came off with minimal problems, the exhaust manifold was a bit a pain, but within 2 hours we had it out.
The suspension at the front of the car was high before, now its more like a caddy!
I've managed to arrange the garage so there is a reasonable amount of space around the whole car, and I don't expect it to come out again for some time now. Time to get it up on high axle stands and start sorting out the body work!
 3 or 5 doors?
For a while I was toying with the idea of welding up the back doors so I could remove the rear bench. I have since come to my senses and am definately going to keep it a 5 door. The question now is whether to shave/smooth all the doors, or to have audi 80 handles on all of them to get the smooth line look without having to have buttons under the wing mirrors for the door openers.
I need to look into wing mirrors to see if I can find one with enough space under for 2 buttons (should be possible). I think the smoothing would be easier than completely changing the mechanism...